
To get started, you will need 5 polishes: a base color, two shades for your flower blossom, and two shades for the leaves. You can get away with one color on leaves but I think two gives the them more depth. Totally up to preference! For the tools, all you will need is a large dotting tool (a bobby pin will work) and a detail brush. You can buy the fancy ones from the beauty supply store or you can do like me and buy the cheap-o kind from the art store. (Keep in mind what the bristles are made of... natural is better since you'll likely have to clean them with nail polish remover. Acrylic and nylon ones can melt!)
For these flowers, I used Sally Hansen Insta-Dri Magenta Motion and Fuchsia Flare. The leaves are Sally Hansen Insta-Dri Chartreuse Chase and China Glaze Tree Hugger. My base is Sally Hansen Insta-Dri Whirlwind White.


You will also need something drip your polish on.... I just use paper. It protects my workspace and keeps everything neat and tidy in one place. Let's get started!
- Paint your nails your chosen base color. In this case, it's the white...

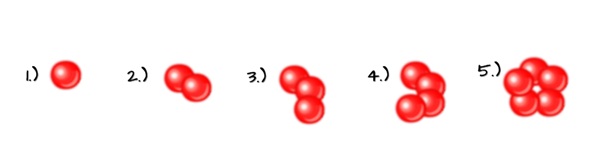
- Then, place a dot of your main flower color on the paper workspace. Using the dotting tool/bobby pin, place a dot on your nail. Work your way around in a circular shape, placing 5 dots (petals) in a flower shape. I did a crappy job of photographing this step so here's an illustration...

- Once you have your flower dotted out, drop a bit of your flower's accent color onto the paper. Using the detail brush, go around your flower adding small curved lines for the edges of the petals... work your way to the center of the flower. I like to finish mine with a little swirl in the middle. How detailed you get is completely up to you... I keep mine a little abstract since it's quicker that way. ;)


- Alright, wipe your detail brush clean of any polish. Now it's time to add the leaves. Drop a bit of the lighter green onto you paper and use your brush to add little swooshes of the green next to the edges of your flowers. I like to put two leaves on one side and a single leave on the other because I'm obsessive like that...

- Good so far! Now here's that optional part... go back and add a line of the darker green to each leave. See the difference? I think it just looks more polished that way, no pun intended.

And voila! You're done! I told you guys this was super easy and it's great for beginners just venturing into nail art. There are some really great tutorials out there for more complicated and detailed designs but this one is so simple that once you've tried it a time or two, you can knock out full flower mani's in 20 minutes flat. I kid you not!
And for a little more inspiration, here are couple of designs I came up with using the five dot flower... so many possibilities!

I hope you guys found this tutorial helpful and if you have any questions or suggestions, feel free to hit me up in the comments!
Thanks for reading!
- Kim
that's so helpful! Thanks :)
ReplyDeleteyes, it´s so helpful and amazing design =D
ReplyDeleteThis is so beautifull! I bought dotting pens and an detail brush yesterday, but didn't know what to do with them. And wit your tut I can use both! :-)))
ReplyDeleteWow, this is amazing! Thank you for the clear explanation, surely will give it a try =]
ReplyDeleteWow! Amazing!!!! You are a GREAT artist:) You should work in the nail salons and get paid extra:D Or start your own buisness or something! *haha* Still loving your blog;)
ReplyDelete*Allie*
www.allieinterrupted.blogspot.com
satta king
ReplyDeleteplay bazaar Learn all you can through seminars before you begin.