Hey guys! I hope you all had a happy and fun 4th of July. Other than dinner at my in-laws, the hubby and I didn't do anything exiting to celebrate since the holiday fell mid-week. We both had to go back to work on Thursday unlike a lot of my friends so, I've just been sitting here envious of all their beach vacation photos they've been posting on facebook ever since. It's okay though... I have spiffy nails that I was able to paint in all my free time.
So for this manicure, I did a variation of the blue ombre nails from a
couple of weeks ago. It wasn't a planned look... it just sort of
evolved. I started out with plain gold nails using Sally
Hansen Complete Salon Manicure Nail Polish in Gilty Pleasure. Then I
suddenly got the idea to do the ombre look using Essie Nail Polish in
Licorice sponged on with a disposable eyeshadow applicator. And since
I'm never ever satisfied, I topped it off with a coat of China Glaze
Matte Magic and ta dah! Fierce gold and black nails.
I really like the ombre look because it's so quick and easy but still packs a punch. People always notice them and I get a lot of compliments or questions on how in the world I did it. So, do you like the ombre look and what are your favorite color combinations?
Thanks for reading!
Kim
Showing posts with label essie. Show all posts
Sunday, July 8, 2012
Friday, June 15, 2012
Blue Ombre
This is actually my 3rd manicure since my last post but the other two were nothing to write home about. This one is a little different though. I'm not 100% pleased with how it turned out but it was a experiment in a different way to paint ombre nails. I followed this tutorial from The Beauty Department.
I think it was definitely quicker and easier than stamping or dabbing on each color individually but I wasn't to thrilled with my color choice. I should have know better because we all know blue polish is the worst for staining skin. I used all Essie brand polish and from left to right they are Smooth Sailing, Mesmerize, and Midnight Tango.
From start to finish, this whole look took about 20 minutes and 15 of that was spent getting the blue off my cuticles... it was the biggest pain. I'm definitely adding this style to my list of quick and easy mani's that pack a little punch and I can't wait to try it again. Next time, I'm thinking pink or silver with black tips. What color combos do you think would look good on ombre nails?
Thanks for reading!
- Kim
Saturday, September 24, 2011
NOTD: Grasslands
Hey guys! I was playing ball with Bella Roo yesterday and my nail on my pointer finger sustained a critical break. She got really excited and tried to grab the ball out of my hand. It was was the perfect storm of puppy teeth, a tennis ball, and a 3 day old manicure... there was nothing I could do to save it. So, I ended up cutting back all my nails since there was such an extreme difference in the lengths... broke my heart. :o(
Oh well, what can ya do? So anyways, I've seen several new takes on stamped zebra and tiger manicures in the past few days and I have to say, I'm a fan! I think my fave has to be this gorgeous number from That's So Fresh... I love the effect the layering created. So being inspired and with my conveniently shorter nails that make for easy stamping, I created my own version.


I used OPI Skull and Glossbones for my base color. Then I sponged on OPI San Tan-tonio, China Glaze Westside Warrior, and Orly Luxe in random spots. After that, I stamped on the zebra print using Essie Licorice with the Konad M57 plate. I started to use a white polish for my base but I wanted the look to be more earthy and fall-ish... I'm definitely glad I did!
Thanks for reading!
- Kim
Oh well, what can ya do? So anyways, I've seen several new takes on stamped zebra and tiger manicures in the past few days and I have to say, I'm a fan! I think my fave has to be this gorgeous number from That's So Fresh... I love the effect the layering created. So being inspired and with my conveniently shorter nails that make for easy stamping, I created my own version.
I used OPI Skull and Glossbones for my base color. Then I sponged on OPI San Tan-tonio, China Glaze Westside Warrior, and Orly Luxe in random spots. After that, I stamped on the zebra print using Essie Licorice with the Konad M57 plate. I started to use a white polish for my base but I wanted the look to be more earthy and fall-ish... I'm definitely glad I did!
Thanks for reading!
- Kim
Friday, September 16, 2011
NOTD: Falling for Leopard
Hey guys! Super quick post since I have to be up for work in just a couple of hours. (eek!) I used OPI Mermaid Tears and San Tan-tonio as my base colors and then the designs were completed using Essie Little Black Dress with the leopard Bundle Monster plate and then I added gold Stripe Rite for the final touch. Easy peasy and ready for fall. ♥


Thanks for reading!
- Kim
Thanks for reading!
- Kim
Wednesday, September 14, 2011
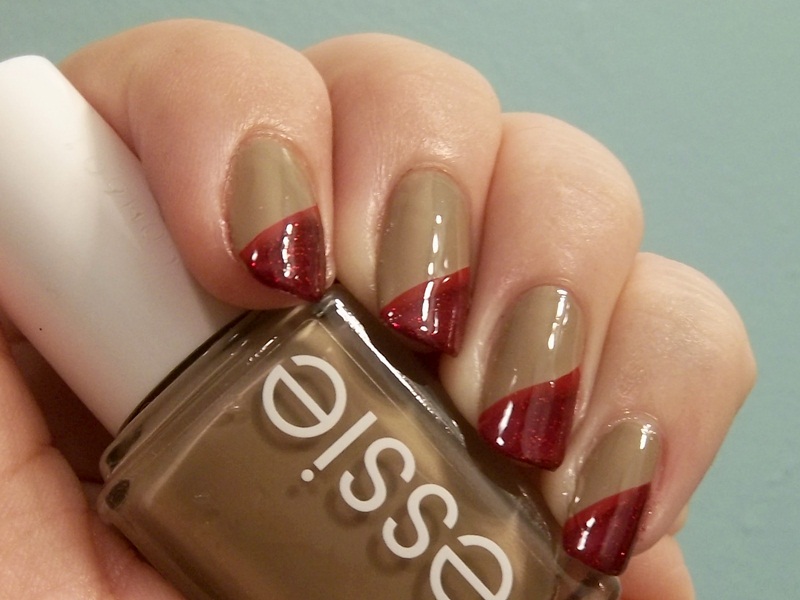
NOTD: A Case Study in Meh
I had this awesome idea for red glitter and tan nails. This is not it. I don't know what happened but my idea got lost in translation and I ended up with this wonky manicure. It's not horrible but I envisioned it differently... it's just kind of meh.
The base is Essie Case Study with Finger Paints Romanticism Ruby on the tips. Then I added a line of Sinful Colors Be My Valentine to divide the two colors a little better. I think a lighter base color might have helped... maybe Essie Jazz or Sand Tropez? Oh well... what do you guys think?


Thanks for reading!
- Kim
The base is Essie Case Study with Finger Paints Romanticism Ruby on the tips. Then I added a line of Sinful Colors Be My Valentine to divide the two colors a little better. I think a lighter base color might have helped... maybe Essie Jazz or Sand Tropez? Oh well... what do you guys think?
Thanks for reading!
- Kim
Monday, August 22, 2011
NOTD: Pretty Purple Pansies
Hey guys! Before I get to the nails, I wanted get your thoughts on the new blog design. I was getting a little tired of the pale watercolor look I had going and wanted something a little bit edgier. I modeled it after my profile picture, lol. I think it's cute but I feel like it needs something else... hmmm.
Anyway, I came across this super simple tutorial by Nail Art Express and I was instantly inspired to do my own version. I love her nail art and if you aren't following her, you definitely should! She has some amazing ideas and is always willing to share what she knows.
For this mani, I used China Glaze VIII (the dark purple) and Sally Hansen Delphinium as my base colors, the flowers were done using China Glaze Spontaneous and VII, Sally Hansen Whirlwind White, and Zoya Gemma. The dots are the Whirlwind White and Essie Licorice. If I were to do this one again, I think I would make the outsides of the flowers the dark purple and the inside the light. But anywho, thanks for reading!
- Kim
Anyway, I came across this super simple tutorial by Nail Art Express and I was instantly inspired to do my own version. I love her nail art and if you aren't following her, you definitely should! She has some amazing ideas and is always willing to share what she knows.
For this mani, I used China Glaze VIII (the dark purple) and Sally Hansen Delphinium as my base colors, the flowers were done using China Glaze Spontaneous and VII, Sally Hansen Whirlwind White, and Zoya Gemma. The dots are the Whirlwind White and Essie Licorice. If I were to do this one again, I think I would make the outsides of the flowers the dark purple and the inside the light. But anywho, thanks for reading!
- Kim
Sunday, August 21, 2011
NOTD: Big Beautiful Blue Blooms
Hey guys! I swear I am addicted to these flower mani's. I did this version using Sally Hansen Insta-Dri Whirlwind White and Blue Away and my newest Essie polish, Mesmerize which is a nice true blue. I love it! (Please ignore my worn tips and dry cuticles... I didn't get around to taking pictures until I had worn this look for a bit.)
I didn't have a specific image I was referencing for inspiration... I just knew in my mind that I wanted this to be a blue and white floral pattern like antique dishes my grandmother used to have. I was pleased with the end result but when I showed Mr. N&W this mani, he said "Oh, blueberries... that's nice." My little heart was broken, lol. So what do you guys think? Are these flowers or blueberries?
Thanks for reading!
- Kim
I didn't have a specific image I was referencing for inspiration... I just knew in my mind that I wanted this to be a blue and white floral pattern like antique dishes my grandmother used to have. I was pleased with the end result but when I showed Mr. N&W this mani, he said "Oh, blueberries... that's nice." My little heart was broken, lol. So what do you guys think? Are these flowers or blueberries?
Thanks for reading!
- Kim
Wednesday, August 17, 2011
NOTD: Bling Dynasty
Hey guys! Quick post today... I did a random design using Bundle Monster image plates BM-208 and BM-221. My base color is OPI Bling Dynasty and the stamps are done with China Glaze China Rouge, Orly Luxe, and Essie Licorice. It's very different than what I would typically wear but I think it's pretty none the less... I'll still probably end up taking it off tomorrow though, lol.
Thanks for reading!
- Kim
Thanks for reading!
- Kim
Thursday, August 11, 2011
NOTD: Kind of Like 80's Wallpaper
I picked up this cute smocked tube top at Target the other day and I was feeling inspired by the fabric pattern... it reminds me of this hideous 80's bathroom wallpaper a friend used to have at her house. I like it better on the shirt than the walls so decided to see if I could imitate it, lol. I started to freehand the design but I thought better of it and broke out my Bundle Monster plates... I went with the feather pattern on BM-214 since it was the closet thing to the palm leaves.
To get this look, I painted my nails with a base coat of Essie Smooth Sailing and then layered stamps of Sally Hansen Insta-Dri in Blazing Blue, Pink Blink, and Brisk Blue and Essie Sand Tropez in no particular order. It was a little time consuming to do that many stamps but I needed the mental break today so I didn't mind. :o)
On a side note, if you're interested in this buying this top, you may want to check out your local Target before getting it online. Mine had these on clearance for $8.98 but the website is still selling them for $17.99 for whatever reason. I swear I will never understand why the prices vary like that, lol. But anywho... thanks for reading!
- Kim
On a side note, if you're interested in this buying this top, you may want to check out your local Target before getting it online. Mine had these on clearance for $8.98 but the website is still selling them for $17.99 for whatever reason. I swear I will never understand why the prices vary like that, lol. But anywho... thanks for reading!
- Kim
Monday, August 8, 2011
NOTD: Gold Leaf
Keeping up with my current flower obsession, I did a metallic version of my five-dot flower manicure using Sally Hansen Xtreme Wear Gunmetal, Sonia Kashuk Smoke & Mirrors, and Orly Luxe over Essie Licorice. I added a little gemstone on my pinkie nails for a little bit of interest.
As an aside, I'm also working on a little tutorial for the flowers which I hope to have up tomorrow. It's so easy and way quicker than a lot of other flower techniques I've seen on line and I promise, anyone can do it! The metallic look isn't the best example for these but if you look at my last two posts, you can probably see the details better. Anywho, thanks for reading!
- Kim
As an aside, I'm also working on a little tutorial for the flowers which I hope to have up tomorrow. It's so easy and way quicker than a lot of other flower techniques I've seen on line and I promise, anyone can do it! The metallic look isn't the best example for these but if you look at my last two posts, you can probably see the details better. Anywho, thanks for reading!
- Kim
Tuesday, July 5, 2011
NOTD: Pink Wednesday - Wild Flower Field
I joined the Pink Wednesday group a long time ago but I always forgot to paint my nails pink or I had another design that I'd rather do. I know, I know... I'm not sure why I committed to do such a thing when it obviously wasn't that high on my priority list either, lol. Well have no fear, my first Pink Wednesday mani is here... finally.
For this one, I painted my nails Essie French Affair and then free handed some grassy, flowery fields using Kiss Nail Artist Black. It was pretty simple to do and took me about 20 minutes to apply. :o)


Thanks for reading!
- Kim
For this one, I painted my nails Essie French Affair and then free handed some grassy, flowery fields using Kiss Nail Artist Black. It was pretty simple to do and took me about 20 minutes to apply. :o)
Thanks for reading!
- Kim
Thursday, June 30, 2011
NOTD: Black and Woo!
Okay, there's a slightly amusing story behind the name of this blog-post. I was cropping my pictures and I was thinking aloud to myself:
I need to think of a clever name for this manicure...
My fiance overheard my rambling and came peeking over my shoulder to see what I was working on. He stood there for a moment, frozen in silence as he looked at my picture and thought about it. Then, out of nowhere, in his best possible movie trailer voice, he blurted out "Black and Woo." I decided to roll with it, lol.


So for my "Black and Woo" manicure, I used Essie Licorice as my base. The silver glitter with the big flecks is from Forever 21. It's simply called Silver Rose Petal Nail Polish but I absolutely love it! The glitter reflects every color of the rainbow and it's so eye catching... I really wish the pictures did it justice. Then to finish my design, I just ran a line of silver Kiss Nail Artist polish along the edge of the Forever 21 polish and sealed it all in with coat of Seche Vite. Super simple and easy to do.

Thanks for reading!
- Kim
I need to think of a clever name for this manicure...
My fiance overheard my rambling and came peeking over my shoulder to see what I was working on. He stood there for a moment, frozen in silence as he looked at my picture and thought about it. Then, out of nowhere, in his best possible movie trailer voice, he blurted out "Black and Woo." I decided to roll with it, lol.
So for my "Black and Woo" manicure, I used Essie Licorice as my base. The silver glitter with the big flecks is from Forever 21. It's simply called Silver Rose Petal Nail Polish but I absolutely love it! The glitter reflects every color of the rainbow and it's so eye catching... I really wish the pictures did it justice. Then to finish my design, I just ran a line of silver Kiss Nail Artist polish along the edge of the Forever 21 polish and sealed it all in with coat of Seche Vite. Super simple and easy to do.
Thanks for reading!
- Kim
Subscribe to:
Posts (Atom)